Pumpkin Carving Tips
Few decorations herald the season like carved pumpkins. You don’t have to do the traditional jack-o-lantern face; you can get really creative and carve all kinds of designs. Here are some tips for pumpkin carving.
1. The Perfect Pumpkin
The perfect pumpkin may not be what you think. Round and flawless may seem like the ideal shape, but think a moment about the more oddly-shaped ones. They can inspire interesting designs, and may result in a very unique pumpkin!
Regardless of shape, look for a firm pumpkin without any soft or rotten spots.
2. The Right Tools
This is one of the most important tips for pumpkin carving. Not only do you get more attractive results with the right tools; it’s also safer to have tools that are designed for the purpose. Here are some of the tools for pumpkin carving:
- Knives – First, you’ll need a large knife to cut the top off the pumpkin. A large carving knife or a serrated bread knife – both as sharp as possible – are good choices. You could also use a small saw, such as a coping saw or keyhole saw. For carving, a small paring knife with a thin, sharp, flexible blade is helpful. A box-cutter or X-acto knife can also work well.
- Spoon – A large spoon is essential for scooping out seeds and pulp. Some of the pulp can be stubborn, so a metal spoon is a better choice than a plastic or wooden one. If you have a fruit spoon with a serrated edge, that might come in handy for scraping out stubborn bits. Also, a small fruit spoon with a serrated edge can help if you want to scrape some of the pulp thin for a glowing effect without actually cutting through the flesh.
- Toothpicks – Having some toothpicks handy can help if you cut off a chunk you meant to leave in! For example, if you are carving teeth and cut one of them off, you can use a toothpick to re-attach the “tooth.”
 3. Cutting Techniques
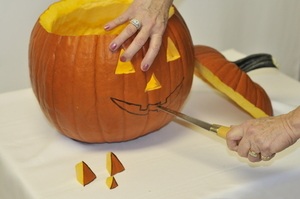
When you cut the top off of your pumpkin, think of a bathtub plug shape. These plugs are wider at the top and narrower at the bottom, so slant your large knife slightly inward so that the base of the cut-off top will be narrower than the top.
When you carve out your design, sources recommend going slowly, and making sure that the blade of the knife never comes out of the pumpkin flesh when you’re cutting with it. Starting with the center and working outward also tends to work better than going from the outside inward.
To support the blog, check out the HBHW eBooks available on Amazon. Thank you!
Disclosure: Some of the links below are affilate links, meaning, at no additional cost to you, I will earn a commission if you click through and make a purchase.

